


Indoor growers and hobbyists often rely on steady, diffuse illumination across propagation shelves and supplemental plant stations, but fluorescent tubes inevitably lose their punch over time. When a lamp starts buzzing, flickering at the margins, or developing dark bands around its cathode ends, photosynthetic output drops and visual strain spikes. Knowing how to replace fluorescent light bulb options correctly ensures your seedling trays or work tables receive consistent illumination without unexpected electrical faults. Many growers depend on reliable T5 fluorescent grow light fixtures to maintain compact vegetative growth, making proper tube rotation a routine maintenance skill.
Different fluorescent styles require distinct handling techniques to avoid breaking delicate glass or damaging fragile socket prongs. Linear mini bi-pin tubes rotate smoothly out of their tombstones, whereas circular T9 fixtures and multi-pin compact fluorescent lamps snap or twist into place under spring tension. Checking pin configurations, ballast compatibility, and correlated color temperatures before making a purchase prevents mismatched components and wasted spending. Taking a measured, safety-conscious approach keeps both your indoor garden and household lighting fixtures operating smoothly across long daily photoperiods.





Comprehensive Guide to Fluorescent Bulb Replacement and Safety
Replacing a fluorescent lamp requires identifying the exact mechanical locking mechanism and pin setup before applying physical force. Whether you are dealing with a straight linear tube, a circular ceiling ring, or a compact multi-pin plug, every design relies on specific contact points that must align with the fixture socket. Handling these glass tubes requires careful attention to electrical safety, mechanical leverage, and environmental disposal rules. Following a systematic procedure ensures your lighting fixture returns to full operational output without damaging delicate tombstone connectors or releasing harmful mercury vapor.
Safety Protocols and Electrical Preparation
Power must always be completely cut at the wall switch or dedicated circuit breaker before touching any fluorescent fixture. Even when a bulb appears completely dead, residual voltage may linger across older magnetic ballasts or faulty wiring circuits. Never attempt to replace a tube that was recently operating, as the glass envelope and metal end caps can remain uncomfortably hot for several minutes. Allowing the assembly to cool down reduces thermal shock to the glass and protects your hands from sudden burns.
Wearing protective eyewear and thin mechanic gloves provides essential defense against unexpected glass shattering. Fluorescent tubes contain low-pressure mercury vapor and an internal phosphor coating that can disperse into the air if the envelope fractures under pressure. Setting up a sturdy stepladder rather than overreaching from an unstable chair keeps your center of gravity balanced when working overhead. Clearing the floor beneath your work area creates a safe staging space for both the spent bulb and the replacement unit.
Identifying Your Fluorescent Bulb Type and Base Configuration
Fluorescent lighting spans several distinct form factors, each engineered with specialized base contacts that cannot be interchanged. Linear miniature tubes like the 12-inch Circle F8T5/WW utilize a G5 mini bi-pin configuration, where two small brass pins sit at each opposing end of the tube. These compact linear options are frequently found in under-cabinet task fixtures, specialty desktop units, and multi-tier propagation shelves. Mismatched pin spacing will fail to seat inside the socket and can easily snap the thin terminal posts if forced.
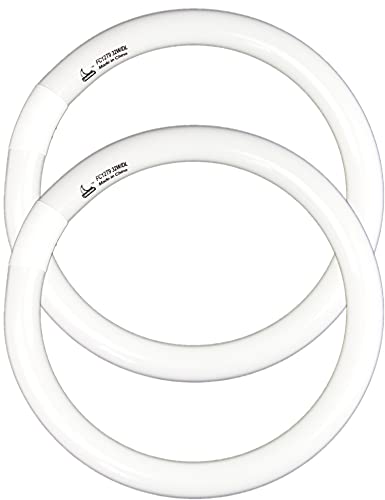
Circular lamps, commonly designated as T9 circline units, feature a continuous glass ring with an integrated four-prong wiring block. Kits such as the CHKADAWA FC8T9 22W and FC12T9 32W sets use a standard G10q four-pin receptacle designed to receive a keyed wiring harness. The diameter of the glass ring directly corresponds to its rated operational wattage, meaning an eight-inch ring draws lower power than a twelve-inch companion. Inspecting the socket housing for the stamped G10q marking verifies physical fit before you disconnect the old assembly.
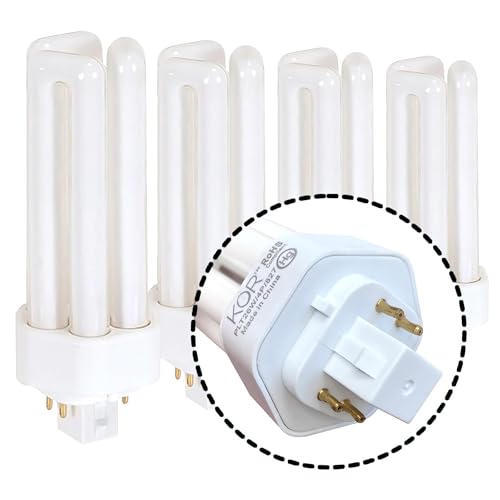
Compact fluorescent lamps feature folded or coiled glass geometries with push-in or twist-in bases. Units like the KOR 13W utilize a GX23 two-pin base containing an internal starter switch, whereas triple-tube designs like the KOR 26W use a four-pin square base intended for electronic ballasts. Specialty desk lamps, such as older fixtures requiring the OttLite 13W replacement tube, depend on proprietary magnetic base designs engineered for specific pre-2008 ballasts. Meanwhile, modern self-ballasted options like the UNITEDLUX 13W T2 spiral employ a GU24 dual-prong twist-lock base that requires rotating rather than pulling.
How to Remove and Replace Linear Fluorescent Tubes
Linear fluorescent tubes are supported at both ends by socket brackets known as tombstones. In standard rotating sockets, gently grip the glass tube with both hands placed near the outer thirds of the lamp. Rotate the tube ninety degrees in either direction until the dual contact pins align vertically with the open tombstone slot. Once the pins reach the vertical exit channel, carefully lower one end of the tube followed by the other to free it from the fixture chassis.
Some linear installations use spring-loaded tombstones rather than open rotating slots. For these fixtures, push the tube firmly toward one end against the internal spring until the opposing end clears its socket bracket, then swing the free end downward. Inspect the plastic tombstones closely for discoloration, heat embrittlement, or hairline cracks before attempting to insert a new tube. Aged plastic sockets can crumble under light pressure, creating loose electrical contacts that cause immediate arcing or intermittent lamp flickering.
Installing the fresh linear tube requires aligning both sets of brass pins with the entry channels of the opposing tombstones. Slide the pins into the sockets simultaneously until the tube rests fully seated in the bottom of the grooves. Rotate the glass cylinder ninety degrees until you feel a firm mechanical detent or hear a subtle click. A properly seated tube will resist slight downward pulling without slipping out of its electrical contact channels.
Replacing Circular Circline Light Fixtures
Circline fixtures rely on metal or plastic retention clips to hold the round glass tube flat against the fixture reflector pan. To begin removal, locate the four-pin electrical wiring connector plugged into the base of the circular tube. Support the glass ring with one hand while gently wiggling the plastic connector plug straight backward away from the four G10q prongs. Never yank on the flexible wire leads themselves, as pulling the conductors can loosen the internal crimp connections inside the terminal harness.
Once the wiring harness is detached, disengage the mechanical retaining clips that secure the glass perimeter. Many ceiling fixtures use spring-loaded metal clips that can be gently pulled outward to release the outer edge of the ring. Carefully tilt the spent bulb away from any remaining fixed brackets and lower it safely out of the fixture housing. Take note of how the wiring socket was oriented relative to the ceiling pan so you can replicate the exact alignment during reassembly.
Position the replacement circline bulb, such as a CHKADAWA FC12T9 32W ring, into the mounting bracket area with its prongs facing the harness. Snap the glass ring securely beneath each spring clip, verifying that the tube sits level and does not rub against sharp metal chassis edges. Align the four female sockets of the wiring harness with the four male G10q prongs on the bulb base. Push the plug firmly onto the prongs until the connector seats flush against the plastic base of the circular lamp.
Swapping Plug-In Pin-Base CFLs and Twist-Lock Bulbs
Replacing plug-in compact fluorescent bulbs requires applying pressure strictly to the rigid plastic base rather than the fragile glass loops. For two-pin GX23 lamps or four-pin triple-tube designs, grasp the molded plastic collar between your thumb and fingers. Pull straight outward along the axis of the socket with steady, controlled force to release the retaining friction clips. Avoid rocking the lamp vigorously side to side, which can snap the internal plastic locating tabs or bend the copper terminal pins inside the base.
Installing a replacement pin-base CFL involves aligning the central plastic guide post with the center keyway of the socket receptacle. Push the bulb firmly into the socket until the base clicks securely into the internal retaining latch mechanism. For specialty task lamps like those using the OttLite 13W replacement tube, verify that the magnetic ballast socket is free from dust or oxidation before seating the replacement. If the bulb does not slide in smoothly, double check that the pin layout matches the socket keying rather than forcing the fit.
Twist-lock bulbs like the UNITEDLUX 13W GU24 operate under a completely different mechanical principle than straight push-in lamps. To remove a GU24 bulb, grasp the lower ballast housing, push upward slightly, and twist the bulb counterclockwise approximately a quarter turn until the pins disengage from their keyholes. To install the replacement, insert the two stout mushroom-headed pins into the wide circular openings of the base socket. Rotate the lamp clockwise until it stops and locks firmly into place, ensuring complete electrical contact across both terminals.
Evaluating Ballast Function Versus Lamp Burnout
Installing a brand-new fluorescent tube will not restore light if the underlying ballast or starter switch has failed. A depleted fluorescent lamp typically shows visible physical warning signs, such as darkened glass rings near the cathode filaments or intermittent pinkish glowing. If a newly installed tube hums loudly, strobes rapidly, or refuses to ignite entirely, the electrical ballast may no longer provide adequate starting voltage. Magnetic ballasts often signal terminal failure by emitting an acrid burning odor or leaking sticky black potting compound into the fixture pan.
Older linear fixtures frequently utilize an external cylindrical starter twist-locked into the chassis alongside the tubes. A failed starter will prevent the cathodes from preheating, leaving the ends of the tube glowing dull orange without striking the main electrical arc. Replacing a canister starter is inexpensive and involves twisting the metal cylinder a quarter turn counterclockwise to pop it free. If a modern fixture with an electronic ballast fails to light after installing verified bulbs, replacing the entire ballast or converting the housing to self-ballasted LED tubes becomes necessary.
Testing socket voltage with a non-contact tester or digital multimeter helps confirm whether electric current is reaching the tombstone terminals. Always shut off breaker power before performing continuity checks across socket leads to avoid accidental contact with live lines. If the tombstones show scorched metal contacts or loose spring tension, the socket must be replaced alongside the bulb to maintain safe conductivity. Restoring sound electrical connections prevents high-resistance hot spots that could damage the replacement lamp prematurely.
Selecting the Right Color Temperature for Plant Growth and Living Spaces
Fluorescent bulbs are manufactured in a wide array of correlated color temperatures measured in Kelvin units. Warm white bulbs measuring between 2700K and 3000K, including the Circle F8T5/WW and UNITEDLUX spiral models, produce an amber-toned glow ideal for living spaces and supplemental floral development. In contrast, cool white and daylight lamps rated at 5000K or 6500K generate a crisp blue-enriched spectrum. Our indoor plant light spectrum guide details how blue wavelengths encourage compact vegetative nodes and prevent etiolation in young greenery.
Daylight sets, such as the CHKADAWA 6500K circline kit or KOR 5000K GX23 lamps, are particularly useful for indoor propagation shelves and overwintering leafy houseplants. The balanced daylight spectrum closely mimics natural morning skylight, stimulating active photosynthesis across broad foliage without generating excessive radiant heat. Natural daylight rendering also makes plant inspection significantly clearer, allowing growers to spot spider mites, thrips, or subtle nutrient chlorosis early. Choosing the correct color temperature ensures your room ambiance matches the biological needs of your botanical collection.
Optimizing Light Delivery Across Propagation Racks and Enclosures
Fluorescent fixtures emit diffuse, low-intensity light that diminishes rapidly as distance from the tube increases. When maintaining seedling flats or rooting cuttings, position linear T5 tubes between two and four inches above the uppermost foliage canopy. Hanging fixtures too high forces tender stems to stretch toward the light source, resulting in weak, spindly seedlings that topple under air circulation. As your plants grow, raise the suspension hardware incrementally to maintain steady photon flux density without physically crowding the glass.
Dust, foliar spray residue, and environmental humidity can coat fluorescent glass envelopes and reflective fixture pans over time. Wiping down the fixture reflector and tube surfaces with a clean, dry microfiber cloth every few months restores lost photon output without purchasing new hardware. Indoor growers managing complex multi-level setups or vertical grow towers with integrated lights know that regular fixture maintenance keeps yields consistent across seasons. Running your fluorescent lighting on an automatic grounded digital timer ensures plants receive an unbroken photoperiod of fourteen to sixteen hours daily.
Safe Disposal and Clean-Up of Broken Fluorescent Glass
Because all fluorescent lamps contain trace amounts of mercury vapor, spent tubes must never be discarded in ordinary municipal trash cans. Local municipal recycling centers, hardware retailers, and county hazardous waste facilities maintain dedicated drop-off bins for unbroken tubes. When transporting spent linear or circline lamps, wrap them in cardboard sleeves or original packaging boxes to prevent accidental impact fractures. Keeping used tubes intact protects sanitation personnel and prevents heavy metal contaminants from leaching into community landfills.
If a fluorescent bulb breaks during installation, immediate safety measures are required to minimize inhalation of airborne mercury vapor. Evacuate people and pets from the immediate room and open exterior windows for at least ten minutes to ventilate the space. Never use a standard vacuum cleaner on broken fluorescent debris, as the vacuum exhaust will vaporize the mercury and disperse fine phosphor particles throughout the room. Instead, use stiff cardboard to sweep glass shards into a sealable glass jar, and press sticky tape onto surfaces to capture microscopic fragments before wiping the floor with damp paper towels.
Practical Verification and Final Inspection Checks
After securing your new fluorescent bulb and restoring electrical power at the breaker, observe the fixture closely during initial ignition. A healthy fluorescent tube should strike smoothly within one or two seconds without flickering continuously or emitting sharp popping noises. Check both ends of the bulb to verify that the glass remains clear without immediate dark scorched bands forming around the internal cathodes. Ensuring the fixture operates silently and evenly confirms that the replacement lamp and internal ballast are functioning in complete harmony.


Write Your Review
No reviews yet. Be the first to share your experience!