


Maintaining overhead illumination in indoor workshops, propagation rooms, and home plant areas often requires accessing the lamps hidden behind protective diffusers. Whether you are addressing discolored acrylic, wiping away accumulated dust, or changing dead tubes, mastering how to remove fluro light cover hardware is an essential maintenance skill. Many indoor gardeners utilize fluorescent fixtures or converted T5 high-output grow light setups to provide steady seedling photoperiods, but aged covers can drastically impede photosynthetic photon delivery. Forcing a stubborn plastic lens without understanding its specific latching system frequently causes cracked diffusers, bent channels, and costly repairs.
Ceiling lighting fixtures employ diverse retention mechanisms ranging from modern magnetic attachments to spring latches and wrap-around friction channels. Prismatic lenses, decorative cloth filters, and clear tube guards each require a slightly different physical touch to detach safely. Taking a methodical approach preserves the integrity of your ceiling hardware while keeping your eyes and hands protected from brittle shards. This comprehensive procedural guide walks you through every major fluorescent cover design so you can service your fixtures smoothly without cracking delicate plastic components.




Comprehensive Guide to Removing Fluorescent Light Covers and Diffusers
Removing a fluorescent light cover requires identifying the fixture mounting style before applying physical pressure. Traditional commercial troffers, basement shop fittings, and indoor gardening propagation racks rely on distinctly different retention mechanisms to hold lenses in place. Forcing a stuck lens often results in cracked acrylic, bent metal channels, or accidental impact with the glass fluorescent tubes underneath. Understanding the correct mechanical release method protects both the fixture hardware and the electrical assembly while ensuring your workspace remains safe.
Identifying Your Fluorescent Fixture and Cover Mechanism
Fluorescent fixtures generally fall into four common mechanical formats across residential basements, classrooms, and indoor growing spaces. Recessed troffers sit flush inside suspended drop-ceiling grids and hold either loose prismatic panels or metal hinged door frames. Surface-mounted wrap fixtures feature curved acrylic covers that snap over the edges of a metal chassis in garages and seedling stations. Strip lights often utilize clear cylindrical tube guards or magnetic decorative fabric covers designed to soften harsh glare.
Distinguishing between rigid acrylic diffusers and modern magnetic fabric covers dictates your removal strategy. Fabric filters held by neodymium magnets pull away smoothly without requiring hand tools or frame disengagement. In contrast, extruded prismatic acrylic panels require careful tilting and lateral shifting to clear the supporting metal lip. Misidentifying a latching hinged frame as a snap-fit cover can bend the sheet metal and permanently damage the housing.
Electrical De-Energization and Environmental Safety Protocol
Electrical safety must always take priority before your hands make contact with any ceiling fixture. Fluorescent ballasts operate with high initial strike voltages that can deliver a painful shock if an exposed socket or wire is compromised. Always flip the dedicated wall switch to the off position before climbing a ladder to access the fixture. For added security in damp propagation rooms or basement grow spaces, shut down the corresponding circuit breaker in your service panel.
Stable footing is essential when reaching overhead to manipulate bulky or awkward plastic diffusers. Position a sturdy step stool or ladder directly underneath the fixture rather than leaning outward at an awkward angle. Wear safety glasses to protect your eyes from dislodged dust, dead insects, or potential plastic fragments. Thin work gloves provide a secure grip on smooth acrylic while shielding your fingers from sharp metal edges on older fixture housings.
Removing Drop-In Prismatic Panels from Suspended Grid Troffers
Drop-in prismatic diffusers are the most common style found in standard commercial ceiling grids and basement workshops. These flat acrylic or polystyrene sheets sit directly atop the lower lip of the suspended metal T-bar frame. To remove the panel, place both flat hands beneath the center of the plastic sheet and push upward several inches into the plenum space. Once the cover lifts clear of the metal grid, slide it horizontally toward one side to create clearance.
Tilting the panel along its long axis allows one edge to drop down through the open grid opening. Guide the lowered edge carefully toward the floor while supporting the remaining weight with your upper hand. Avoid twisting the panel diagonally, as older polystyrene can snap cleanly in half when subjected to rotational torque. Slowly lower the entire sheet out of the grid opening and place it flat on a clean, stable surface.
Detaching Hinged Troffer Diffuser Frames and Latch Mechanisms
Many commercial recessed fixtures house their prismatic lenses inside a dedicated steel or aluminum door frame. These frames do not push directly into the ceiling plenum because they are secured to the fixture housing by mechanical latches. Inspect the long outer edges of the frame to locate the sliding clips, spring catches, or cam latches holding it closed. Sliding latches typically require inward finger pressure or a gentle slide parallel to the frame to release the catch.
After releasing the primary latches, support the frame with one hand as it pivots downward on its internal hinges. The frame should swing freely along one side, granting open access to the fluorescent lamps and ballast compartment. If you need to remove the entire door frame for washing, push upward on the hinged side to disengage the T-hinge pins. Keep a firm two-handed grip during this transition to avoid dropping the heavy steel frame onto propagation trays below.
Disengaging Wrap-Around Acrylic Lenses Without Cracking
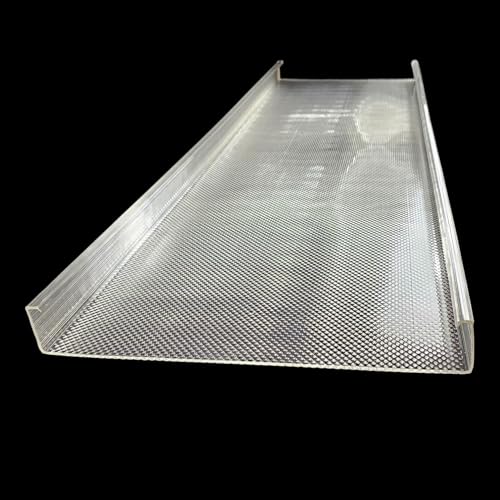
Surface-mounted wrap fixtures utilize extruded acrylic lenses with contoured side rails that hook over the metal fixture chassis. These lenses are common in home workshops, utility closets, and multi-tier seedling racks. To remove a wrap-around cover, place your hands along the long bottom edge of the acrylic diffuser. Push gently upward while flexing the vertical side wall inward to release the locking lip from the sheet metal channel.
Once one side unhooks from the channel, allow that edge to drop down slowly while holding the center body. Pivot the lens along the opposite side rail and lift it free from the remaining chassis flange. Some wrap-around designs incorporate decorative plastic end caps secured by small Phillips screws or locking tabs. Loosen these end caps first if the lens resists lateral movement or appears trapped behind the outer decorative trim.
Detaching Magnetic Fabric Diffusers and Aesthetic Light Filters
Magnetic fabric filters have become popular solutions for softening harsh fluorescent glare in home offices and plant rooms. Brands such as Patelai, Biubee, OCTO LIGHTS, and Wiooffen manufacture polyester fabric panels embedded with powerful perimeter magnets. These fabric sheets attach directly to the exposed steel grid around troffers or the painted metal housing of strip lights. Removing them is remarkably straightforward because no mechanical screws, clips, or sliding latches are involved.
Reach up toward one corner of the fabric panel and pinch the edge firmly between your thumb and forefinger. Peel the corner downward to break the magnetic bond between the sewn-in neodymium magnet and the ceiling grid. Continue working along the perimeter edge, peeling each consecutive magnet away from the steel surface in sequence. Fold the lightweight fabric neatly once removed to prevent wrinkles and protect the sewn-in magnet pockets from tearing.
Removing Linear Tube Guards and Horticultural Bulb Sleeves
Horticultural growers using bare T5 and T8 fluorescent fixtures often install clear polycarbonate tube guards over their lamps. These cylindrical plastic sleeves shield delicate glass tubes from accidental splashing during foliar feeding or watering. Removing a protective tube guard requires first disengaging the fluorescent bulb from its tombstone lamp holders. Rotate the lamp ninety degrees until the electrical contact pins align with the socket exit slot, then lower the tube carefully.
Slide the plastic end caps off both ends of the tube guard while holding the assembly over a soft work mat. Gently slide the glass fluorescent lamp out through the open end of the cylindrical polycarbonate sleeve. Inspect the sleeve interior for condensation, algae buildup, or dust accumulation that can reduce light transmission. Wash the sleeve with mild dish soap and warm water, allowing it to dry thoroughly before reinstalling it over the lamp.
Managing Brittle Plastic, Stubborn Clips, and Stuck Fixture Channels
Fluorescent fixtures produce significant ambient heat, while older magnetic ballasts subject internal components to constant thermal cycles. Over years of continuous operation, ultraviolet radiation and warmth degrade standard acrylic and polystyrene diffusers into brittle plastic. If a wrap-around cover resists inward flexing, applying excessive force will cause the plastic to shatter along stress lines. Slide a flat, non-marring plastic putty knife along the seam between the metal chassis and the lens lip to ease tension.
Painted metal troffer channels occasionally stick to acrylic panels due to accumulated airborne grease or ceiling paint overspray. Run a utility blade lightly along the exterior paint line if ceiling paint has sealed the lens frame to the drywall. Tap the perimeter frame gently with the palm of your hand to break minor adhesive bonds without cracking the lens. If metal spring clips are rusted shut, apply a drop of silicone lubricant to the pivot point before attempting to unlatch them.
The Impact of Cover Removal on Photosynthetic Photon Delivery (PPFD)
Removing a diffuser cover significantly alters the quantity and quality of light reaching indoor plant canopies. Prismatic acrylic panels and magnetic fabric filters diffuse light uniformly across a room, but they also absorb valuable photons. Removing a yellowed or heavy prismatic cover can increase canopy photosynthetic photon flux density by fifteen to twenty-five percent. For seed starting and vegetative growth, understanding spectral balance for indoor plant development helps ensure your plants capitalize on this increased intensity.
Higher photon transmission helps prevent seedling etiolation and promotes compact, stocky stem structure on propagation shelving. Bare fluorescent tubes deliver direct downward photon flux without the internal reflection losses caused by dirty plastic barriers. However, removing the lens eliminates the physical shield protecting fragile glass lamps from high humidity and accidental impacts. Indoor growers must balance the desire for maximum photon output against electrical safety and environmental splashing hazards.
Cleaning, Maintenance, and Reinstallation Best Practices
Once you remove a fluorescent light cover, proper cleaning restores optical clarity and eliminates accumulated insect debris. Wash acrylic and polycarbonate lenses using lukewarm water, mild dish detergent, and a soft microfiber washcloth. Never clean plastic diffusers with harsh chemical solvents, ammonia sprays, or abrasive scouring pads that scratch acrylic surfaces. Rinse the panel thoroughly with clean water and pat it dry with a lint-free towel to prevent mineral water spotting.
Reinstalling a drop-in panel follows the reverse sequence of removal by lifting the sheet diagonally into the ceiling grid. Level the panel horizontally above the opening and lower it gently onto the supporting T-bar flanges. When replacing wrap-around lenses, hook one side rail fully into the fixture channel before flexing the opposite edge into place. Ensure the cover seats completely along its entire length to prevent the lens from vibrating loose during daily operation.
Evaluating Acrylic Replacement Diffusers Versus Direct LED Retrofits
If your existing fluorescent cover is cracked, badly warped, or deeply discolored, replacement is often necessary. Manufacturers like FP Fluoroliteplastics offer clear prismatic acrylic wrap lenses designed to fit standard two-lamp and four-lamp fixtures. Clear acrylic replacements restore clean light diffusion while preventing premature discoloration from ongoing exposure to heat and light. Gardeners exploring automated setups can also compare traditional shop fixtures against vertical grow towers with integrated lights for compact indoor cultivation.
Many property owners and hobby growers take cover removal as an ideal opportunity to convert fixtures to modern LED tubes. Direct-wire ballast-bypass LED lamps eliminate noisy ballasts entirely while significantly cutting electrical power consumption. Because LED tubes run substantially cooler than older fluorescent lamps, plastic replacement covers last far longer without becoming brittle. Whether you reinstall a freshly cleaned acrylic cover or upgrade your internal components, proper handling ensures lasting performance.
Taking the time to identify your fixture style makes fluorescent cover removal a straightforward, safe task. Supporting panels evenly with two hands prevents accidental fractures on older, heat-stressed plastic diffusers. Cleaning or replacing cloudy covers directly improves the usable illumination and photosynthetic energy reaching your workspace or plant stands. By following steady mechanical steps and respecting basic electrical safety precautions, you can maintain your overhead lighting with complete confidence.


Write Your Review
No reviews yet. Be the first to share your experience!