


Indoor growing spaces, seed-starting benches, and tall residential rooms often rely on continuous overhead illumination to keep plants flourishing and work areas visible. When an overhead tube or high-mounted fixture goes dark, figuring out how to change long light bulb assemblies safely becomes an immediate priority. Handling delicate glass tubes or reaching high-bay sockets without tipping over ladders requires careful preparation, especially around fragile foliage or narrow shelving. Many growers utilizing high-output T5 grow lights encounter dual-pin tombstones and narrow housing channels that demand precise alignment rather than brute force.
Replacing these extended bulbs involves understanding the specific mechanical socket, whether you are dealing with a bi-pin linear fluorescent tube or an elevated fixture mounted well beyond standard reach. Telescopic extension poles equipped with adjustable silicone-wrapped baskets and heavy-duty suction attachments allow you to access elevated fixtures from the stability of the floor. By matching the right tool to your fixture type, you can prevent broken glass, avoid physical strain, and restore essential light cycles to your plants with complete confidence.



Step-by-Step Instructions for Changing Long Bulbs and High Overhead Lights
Changing a long light bulb successfully comes down to identifying whether you are handling a horizontal linear tube or reaching an elevated overhead fixture with a specialized extension tool. Linear fluorescent and LED replacement tubes rely on bi-pin alignment within molded tombstone sockets, requiring a gentle quarter-turn to release. Elevated floodlights and high-ceiling recessed bulbs require sturdy telescopic poles equipped with silicone-padded gripping fingers or suction attachments. Approaching the task with the right mechanical method ensures you complete the replacement quickly without damaging fragile electrical contacts or risking glass breakage.
Understanding Long Bulb Types and Fixture Mechanisms
Long bulbs fall into distinct physical categories across domestic, commercial, and indoor gardening environments. Linear tubes feature dual electrical contact pins at each end that slide into specialized sockets known as tombstones. In contrast, elevated high-bay fixtures and vaulted ceiling downlights often utilize long-neck reflector bulbs that screw into standard threaded bases positioned several yards overhead. Recognizing which mechanical interface your fixture uses dictates whether you need hands-on socket rotation or a specialized high-reach pole.
Linear fluorescent and LED retrofit tubes depend on standardized pin spacing to transfer electrical current reliably. The most common varieties include miniature bi-pin G5 bases found on slim T5 tubes and medium bi-pin G13 bases found on thicker T8 and T12 tubes. Inside the tombstone socket, metal contact leaves grip these pins to complete the circuit while physically supporting the weight of the tube. Forcing a tube without properly aligning the pins with the entry slot can crack the brittle plastic housing or bend the contact prongs.
Overhead fixtures mounted in high-ceiling spaces present a completely different set of physical demands. These fixtures often house large reflector lamps or long-body decorative bulbs positioned ten to twenty feet above the floor. Climbing tall stepladders near indoor garden shelving or smooth flooring introduces severe fall hazards that are entirely avoidable. Utilizing extendable pole changers with specialized gripping heads allows you to manipulate these screw-base or recessed lamps safely while keeping both feet firmly on the ground.
Essential Safety Preparation Before Handling Overhead Lighting
Electrical safety is the paramount concern whenever you work with lighting fixtures. Always turn off the wall switch controlling the fixture, and switch off the dedicated circuit breaker in your electrical service panel for maximum protection. Ballasts and electronic drivers can retain residual current or unexpectedly energize the socket contacts if someone accidentally flips a wall switch. Cutting the power at the breaker box eliminates the danger of electric shock while your fingers or tools are in close proximity to the contact terminals.
Allow the existing bulb and housing ample time to cool before attempting removal. High-output fluorescent grow tubes, compact ballasts, and high-wattage reflector lamps generate considerable thermal energy during standard photoperiods. Handling hot glass can cause involuntary hand twitches that lead to dropped bulbs, shattered glass, and severe cuts. Waiting fifteen to twenty minutes after cutting power ensures the glass envelope and metal socket components reach a safe, manageable temperature.
Prepare the workspace beneath the fixture before beginning the replacement procedure. Relocate delicate indoor plants, propagation trays, and freestanding furniture away from the immediate drop zone. If you must work over an active plant canopy that cannot be moved, drape a clean canvas tarp or heavy drop cloth over the foliage. This protective layer catches accidental debris, protects delicate leaves from falling dust, and simplifies cleanup in the rare event of a fractured tube.
How to Remove and Replace Linear Bi-Pin Fluorescent and LED Tubes
Removing a linear tube begins by establishing a firm, two-handed grip along the body of the bulb. Position your hands roughly one-quarter of the way inward from each socket end to distribute lifting pressure evenly across the length of the glass. Never grip a long tube solely by the center, as flexing the middle section can cause sudden structural failure. Gently twist the tube ninety degrees along its central axis in either direction until the contact pins rotate out of their internal locking position.
Once the pins rotate ninety degrees, they align with the vertical exit slot of the tombstone socket. Carefully lower the tube straight down out of the fixture, keeping the bulb completely level so neither end jams in the track. If one side sticks, avoid yanking or twisting with excessive force. Instead, verify that the opposite end is fully rotated and gently wiggle the tube until both pairs of pins slide free of the socket channels.
Installing the replacement tube requires identical attention to pin alignment and orientation. Inspect both ends of the new bulb to confirm the contact pins are straight, clean, and parallel. Hold the new tube horizontally, align the dual pins at each end with the open vertical slots in the tombstones, and push upward until the pins seat fully into the bottom of the track. If the fixture features spring-loaded tombstones, push gently toward the spring-loaded end first to create clearance for the opposite side.
Rotate the newly inserted tube ninety degrees along its axis until you feel the pins lock firmly into place. Many modern horticultural and commercial tubes feature alignment marks or printed manufacturer lines along the end caps to indicate correct positioning. When properly seated, the tube will feel secure and will not drop downward when you release your hand support. Wipe the exterior surface of the tube with a dry microfiber cloth to remove oily fingerprints, which can create localized hot spots once energized.
Using Telescopic Extension Poles for Elevated and Recessed Bulbs
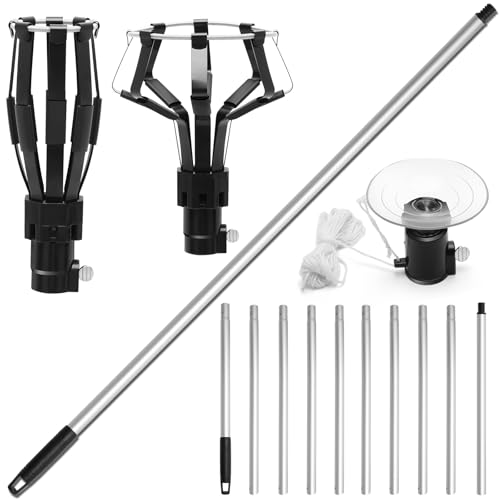
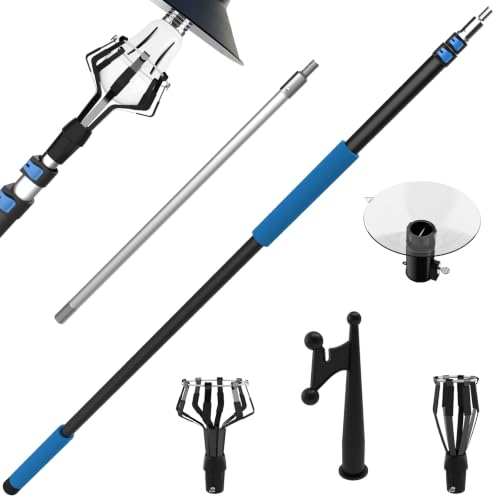
Elevated fixtures mounted on vaulted ceilings or above tall grow benches require long-reach pole tools rather than precarious ladders. Extendable tools from brands like Karveden, BUYPLUS, and LOVEETA utilize multi-section aluminum poles that expand to provide substantial overhead reach. These systems rely on secure flip-tab or twist-lock collars at each telescoping segment to maintain rigidity when fully extended overhead. Ensuring that each locking collar is clamped tightly prevents the pole from sliding down or bowing under torque while you work.
Selecting the appropriate attachment head depends on the physical profile of the overhead bulb. Multi-finger steel or plastic baskets wrapped in high-friction silicone work best for standard A-line, PAR, and outdoor floodlight shapes. The flexible fingers spread outward as you push the basket upward against the bulb, wrapping securely around the glass body to provide rotational traction. For smooth, flat-faced bulbs seated flush inside recessed can fixtures, a heavy-duty suction cup attachment creates an airtight seal that transfers turning torque directly to the threaded socket.
Position yourself directly beneath the elevated fixture, keeping your feet shoulder-width apart to maintain solid balance. Raise the extended pole vertically, aligning the gripping head with the center of the target bulb. When using a suction head, push firmly upward until the cup adheres flat against the glass face; when using a finger basket, push upward until the silicone grips encase the widest part of the bulb. Rotate the pole counterclockwise smoothly to back the threaded base out of the ceiling socket.
Lower the pole steadily once the spent bulb releases from the socket, keeping the tool upright until you can reach the head by hand. To install the new bulb, seat it firmly into the gripping fingers or suction cup before raising the pole. Elevate the assembly, guide the threaded brass base into the overhead socket opening, and turn the pole clockwise until you feel snug mechanical resistance. If you used a suction attachment, pull the attached release string gently to break the vacuum seal and lower your pole safely back to the ground.
T5, T8, and T12 Linear Tube Compatibility and LED Upgrades
Selecting the correct replacement bulb requires identifying the precise diameter and electrical requirements of your existing linear fixture. Linear fluorescent tubes are classified by the letter T followed by an eighth-of-an-inch measurement number. A T5 tube measures five-eighths of an inch in diameter, a T8 tube measures one full inch, and an older T12 tube measures one and a half inches across. Because their pin spacings and operating wattages differ, you cannot insert a T5 bulb into a T8 socket without specialized conversion brackets.
Many growers and property owners replace outdated fluorescent tubes with energy-efficient linear LED retrofit bulbs to reduce operating costs and lower ambient heat. When upgrading, you must choose between plug-and-play Type A tubes and ballast-bypass Type B tubes. Type A LED tubes operate directly on the existing electronic fluorescent ballast, allowing instant installation without rewiring. Type B tubes require you to disconnect and bypass the internal ballast, routing mains line voltage directly to non-shunted tombstone sockets for improved long-term reliability and lower electrical loss.
Spectrum selection also plays a significant role when replacing long linear bulbs in growing environments. If you are propagating young vegetable starts or overwintering indoor foliage, evaluating the best light color for indoor plants helps ensure your replacement tubes provide sufficient blue and red wavelengths for compact cellular development. Choosing full-spectrum 5000K or 6500K daylight tubes encourages tight internodal spacing and healthy vegetative growth, whereas warmer 3000K spectrums provide the necessary red photons to support flowering and fruiting cycles.
Troubleshooting Common Replacement Problems and Socket Failures
If a newly installed long bulb fails to illuminate or flickers intermittently, start your diagnostic process by checking mechanical pin seating. Even a slight five-degree rotational error can leave the contact prongs resting on the plastic outer rim rather than engaging the internal copper contact leaves. Turn off the wall switch, grasp the tube near each end, and slowly rock the bulb back and forth within the tombstone track until both ends settle squarely into the electrical contact position.
Over extended periods of thermal cycling, plastic tombstone sockets often turn brittle, crack, or lose internal spring tension. If you notice a burned plastic odor, visible brown scorch marks on the socket face, or a tube that sags downward from the fixture, the tombstones must be replaced. Attempting to force a long bulb into a damaged socket creates high electrical resistance, localized arcing, and severe fire hazards. Replacement tombstones are readily available and snap into standard fixture sheet metal channels with minimal effort.
When using telescopic extension poles on high ceilings, recurring slippage usually stems from dusty bulb glass or soiled silicone grips. Wipe the rubber suction cup or silicone basket fingers with a damp cloth and mild dish soap to remove grease and debris before attempting another lift. Additionally, ensure the pole sections are properly extended from thickest bottom tube to thinnest top segment. Extending the lower, heavier segments first provides greater structural rigidity and reduces pole flex when rotating overhead fixtures.
Safe Handling, Disposal, and Post-Installation Verification
Handling older linear fluorescent tubes requires careful disposal precautions because they contain small quantities of vaporized mercury. Never throw spent fluorescent tubes into standard household trash compactors or municipal curbside bins where compaction can rupture the glass envelope. Many local home improvement centers, municipal waste transfer stations, and hardware stores offer free recycling drop-off boxes specifically engineered for long fluorescent tubes. If a bulb shatters accidentally, ventilate the room immediately for fifteen minutes, avoid vacuuming, and scoop up glass fragments using stiff cardboard.
After successfully installing your replacement bulbs, restore power at the service panel and activate the lighting circuit to audit overall performance. Check that the light output is completely uniform across the entire length of the tube without dark bands, strobing, or buzzing sounds from the housing. If you maintain multi-tier shelving setups or vertical grow towers with built-in lights, confirm that your 24-hour mechanical or digital timers switch on reliably according to your planned photoperiod schedule.
Taking a systematic, safety-first approach to changing long bulbs protects both your electrical equipment and your personal well-being. By understanding the mechanical rotation of bi-pin tombstones and using sturdy telescopic extension poles for hard-to-reach fixtures, you eliminate the risks associated with hazardous ladder work. Regular socket inspection, proper ballast-to-LED matching, and clean installation techniques will keep your living spaces bright and your indoor plants thriving under steady, dependable illumination.


Write Your Review
No reviews yet. Be the first to share your experience!