


Indoor foliage and propagating seedlings often struggle beneath commercial troffers or basement shop lights when aged plastic diffusers scatter usable photons. Prismatic acrylic panels and wrap-around lenses can trap airborne dust, turn brittle from heat, and cut down usable photosynthetic photon flux density (PPFD) before light ever reaches the plant canopy. Understanding how to remove fluorescent lighting covers allows you to access lamps for routine maintenance, clean optical surfaces, or switch to high-output tubes. Learning the right mechanical release methods protects fragile plastic from snapping while keeping your workspace and indoor greenery safe.
Whether you manage standard drop-ceiling troffers, surface-mounted utility fixtures, or modern magnetic fabric filters, each fixture design uses distinct latching hardware. Removing an acrylic shield lets you install efficient linear T5 HO grow lights or clean off years of dust buildup that reduces photosynthetic output. Taking the cover down also gives you full access to inspect internal ballasts, verify tube sockets, and eliminate annoying fixture hum. A gentle approach ensures that you avoid cracked lenses, falling debris, or damaged plant leaves below.



Comprehensive Guide to Removing and Managing Fluorescent Light Covers
Removing a fluorescent lighting cover requires understanding the specific retention system holding the diffuser or shade in place. Most residential, office, and indoor growing spaces utilize drop-ceiling troffers, surface-mounted wrap-around diffusers, hinged metal frames, or magnetic fabric panels. Forcing a stuck lens often cracks brittle acrylic or bends fragile sheet metal, which creates safety hazards and ruins the fixture. Identifying your fixture model and using the proper hand positioning ensures that you can safely take down the cover without damaging tubes, sockets, or plants growing underneath.
Identifying Your Fixture Style and Cover Mechanism
Drop-ceiling troffers represent the most widespread commercial style found in basements, offices, and indoor plant rooms. These recessed rectangular units, typically measuring two feet by four feet, rest directly within a suspended T-bar grid. In many installations, a flat prismatic acrylic lens sits loose inside a perimeter frame or directly atop the steel grid lip.
Surface-mounted wrap-around fixtures are common along garage ceilings, workshops, and utility plant shelves. These fixtures mount flush against drywall or joists, using a clear or prismatic plastic diffuser that wraps around the sides of the bulbs. Detaching them requires gentle flexing along the outer edges to release the plastic lip from the retaining metal rails.
Hinged troffers incorporate a rigid steel or aluminum door frame that holds the prismatic lens securely. You will find small slide latches or rotary turn-buttons along one side of the metal border. When you release these latches, the door frame swings down on integrated pivot pins along the opposing edge to provide bulb access.
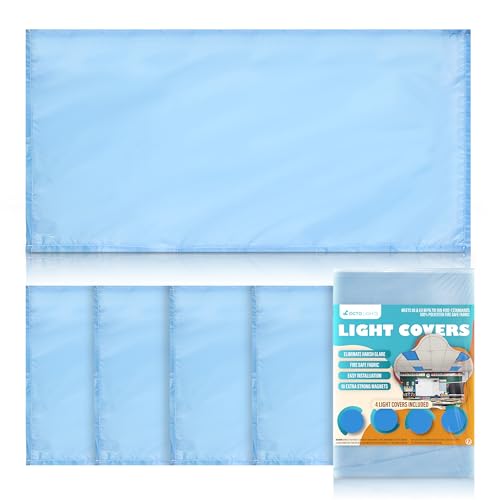
Magnetic fabric covers from brands like OCTO LIGHTS, Fumete, and Fluorescent Light Cover use a different attachment method. These decorative fabric screens feature strong rare-earth magnets sewn along the perimeter seams. They mount directly to the exposed steel grid of drop ceilings or metal troffer housings without requiring any tools.
Safety Preparation and Workspace Clearance
Always de-energize the lighting circuit before touching any overhead ceiling fixture. Turning off the local wall switch is essential, but shutting off the breaker provides reliable protection against unexpected voltage. Fluorescent ballasts can short out if loose wiring shifts while you manipulate the housing overhead.
Position a sturdy stepladder on a level, dry surface directly beneath the fixture rather than reaching out at an awkward angle. Never stand on plant stands, grow tables, or rolling office chairs to reach overhead covers. If you cultivate seedlings or houseplants beneath the light, relocate the trays or shield them with cardboard to guard against falling dust.
Put on lightweight work gloves and safety glasses before handling overhead diffusers. Aged fluorescent covers turn brittle after years of ultraviolet exposure and continuous heat from linear tubes. Gloves improve your grip on smooth plastic surfaces and protect your skin against sharp edges if aged acrylic cracks.
Removing Prismatic Troffer Panels from Drop Ceilings
Start by identifying whether the prismatic acrylic lens rests directly on the ceiling grid or inside a hinged frame. For grid-supported lenses, place both palms flat against the underside of the plastic sheet near the center. Push upward gently until the panel lifts clear of the surrounding metal T-bars by an inch or two.
Once the sheet clears the grid lip, slide it horizontally toward one side of the ceiling opening. This horizontal shift allows the opposite long edge of the panel to drop below the ceiling plane. Tilt the panel diagonally so that its narrow edge points downward toward the floor.
Guide the tilted sheet slowly through the ceiling opening with both hands supporting its weight. Keep your fingers spread across the plastic surface to distribute balance evenly as you step down the ladder. Place the removed lens on a clean, flat table where nobody will step on it or kick the edges.
Detaching Wrap-Around Lenses on Surface Fixtures
Surface-mounted shop fixtures and garage lights typically feature a wrap-around plastic lens that clasps onto the metal body. Look closely at the long seams where the plastic meets the painted steel fixture housing to identify the retention channel. Most wrap-around diffusers utilize an extruded lip that snaps over an outward-flanged metal rail.
To disengage a snap-on wrap-around lens, place your fingers along the upper edge of one long side while pressing your thumbs against the fixture base. Apply steady, gentle inward pressure along the side of the plastic diffuser to flex the lip away from the metal catch rail. Work from one end of the fixture toward the middle rather than attempting to pry the entire length off at once.
Once one side pops free, support the lens with your free hand while allowing the disengaged side to swing downward. The opposite side often rests inside an open hinge groove, allowing the diffuser to hang safely without falling. To remove the lens completely, tilt it upward slightly to unhook the remaining lip from its track and lower it carefully.
Opening Hinged Troffer Doors and Releasing Latches
Commercial troffers with integral door frames require unlatching before the lens can swing open. Inspect the long edges of the frame to locate two mechanical slide latches or rotary cam toggles. Slide latches usually feature ribbed plastic or metal tabs that you push inward toward the fixture center.
Support the center of the door frame with one hand while operating the second latch with your other hand. As soon as both latches clear their retention slots, let the door swing downward under control until it hangs vertically from its opposite hinge pins. This open position grants full clearance to inspect lamps, check ballast labels, or vacuum dust from the housing.
If you need to remove the door frame completely to wash the lens or service wiring, examine the hinge mechanism along the pivot edge. Most commercial troffers use T-shaped hinge pins that slide out when the door reaches a specific forty-five-degree angle. Lift the entire frame upward and tilt the pins out of their corresponding slots in the housing.
Detaching Magnetic Fabric Ceiling Light Filters
Magnetic fabric covers from brands like OCTO LIGHTS, Fumete, and Fluorescent Light Cover are engineered for tool-free installation and removal. These panels fit over standard drop-ceiling troffers, using embedded magnets to grip the exposed steel T-bar grid. Because there are no plastic clips or rigid channels, taking them down requires only minimal physical effort.
Reach up to an outer corner of the fabric panel and grip the hem directly where a magnet is sewn into the border. Pull gently downward and inward to break the magnetic hold against the ceiling grid. Continue working along the outer border, peeling each subsequent magnet away from the steel framework one at a time.
Inspect the fabric and magnets once the filter is down to ensure all magnetic disks remain securely inside their stitched pockets. These flame-retardant fabric diffusers can collect airborne household dust, plant pollen, and moisture over time. Folding them loosely prevents sharp creases, keeping the fabric smooth and ready for clean reattachment when you want to soften overhead glare.
Photometric and Horticultural Effects of Removing Covers
Clear acrylic and polystyrene diffusers scatter light across office spaces to reduce glare, but they scatter light at the expense of intensity. Prismatic patterns, yellowed plastic, and accumulated dirt films can block fifteen to thirty percent of usable photosynthetic photon flux. When you take the cover off, unhindered photons travel directly down to seedling trays and houseplant canopies below.
Removing the cover increases the daily light integral (DLI) delivered to your indoor plants during standard photoperiods. Young vegetable seedlings, microgreens, and tropical aroids require consistent light accumulation each day to build sturdy stems and vibrant foliage. Removing a cloudy diffuser helps prevent the etiolation and leggy growth typical of plants grown beneath covered ceiling fixtures. When retrofitting fixtures with high-output tubes, understanding the best light color for indoor growing helps you match Kelvin spectrums to vegetative growth goals.
Fixtures without covers also benefit from superior passive heat dissipation around the linear tubes and internal ballasts. Enclosed plastic diffusers trap warm air inside the troffer housing, driving up ambient temperatures and shortening the operating life of sensitive electronic components. Growers using dedicated plant setups or multi-tier grow towers with lights often keep diffusers off entirely to optimize canopy ventilation and photon delivery.
Consider visual comfort alongside plant benefits before deciding to leave fluorescent fixtures permanently uncovered. Bare fluorescent tubes emit sharp horizontal glare and harsh flicker that can cause eye strain in living rooms, home offices, and classrooms. If your plants share space with people, replacing rigid prismatic lenses with magnetic fabric covers from OCTO LIGHTS or Fumete provides a balanced middle ground. These breathable fabric covers soften glare and create appealing ceiling patterns while still passing diffuse, usable light to the floor.
Cleaning, Inspection, and Reinstallation Best Practices
Use the opportunity while the cover is down to thoroughly clean both sides of the acrylic lens and the fixture interior. Wash the plastic panel in a shallow tub or shower using lukewarm water, a few drops of mild dish soap, and a soft microfiber towel. Avoid ammonia-based glass cleaners, abrasive scrubbing pads, or harsh chemical solvents that cause acrylic to haze or craze.
Inspect the interior wiring, lamp holders, and ground connections before putting the diffuser back into place. Look for heat discoloration, cracking around plastic tombstones, or loose bi-pin contacts that might cause lamps to arc or flicker. Replacing failing fluorescent tubes with energy-efficient LED retrofits at this stage saves you from taking the cover down again in the near future.
Reinstalling the cover follows the exact reverse sequence of your removal steps. For drop-ceiling panels, lift the sheet through the opening at an angle, level it above the T-bar grid, and seat it evenly into the perimeter recess. For wrap-around fixtures, hook one long side into its hinge track first, then press upward along the opposite rail until the retention lip snaps securely into place.
Mastering these removal techniques keeps your lighting maintenance safe, efficient, and free from frustrating plastic breakage. Taking down diffusers allows you to boost light intensity for your indoor plants, clean out trapped debris, and swap outdated tubes for modern horticultural alternatives. Take your time, handle older plastic panels with gentle two-handed support, and always verify stable seating when reinstalling your fixtures.


Write Your Review
No reviews yet. Be the first to share your experience!